Container Networking
Overview
Container networking is built using the standard networking concepts (switches, NICs, IP Tables etc.) and applications running inside the containers chug along like they are connected to standard networking plumbing.
In this Part-2 of Demystify Containers series, you will learn following about the container networking.
- What is a container (optional)
- Container networking - the big picture (Theory)
- Container networking - the big picture (Hands-on)
- Container network topologies (Bridge, Overlay, Macvlan etc.)
- Docker - service discovery
- Docker - ingress networking
- Conclusion
FYI: Linux Ubuntu with Docker will be used for concept illustration and hands-on examples.
Note: Host~Node refer to the environment where your container is running
What is a Container (refresher)
Before jumping into container networking, let’s refresh, what is a container.
For in-depth details, please reference Container Basics.
- Containers are isolated processes.
- Linux kernel features - namespaces and cgroups - helps each process achieve the necessary isolation from other processes. Commonly, process isolation maps to container boundary.
- By default, Linux system resources (CPU, RAM, Network stack etc.) and hosted processes, all reside within the single
root namespace. - For each container, following collection of namespaces are created
- 0/ cgroups
- 1/ Network: virtual network interface card, IP, routing table etc.
- 2/ Mount: isolate storage (filesystem different than the host system) inside our container. Fun fact,
Mount namepsaceis the first isolation capability added to the Linux kernel. - 3/ IPC (inter process communication): system resources that allow processes to talk to each other. Example: System V IPC, POSIX message queue.
- 4/ PID: provides processes with an independent set of process IDs (PIDs) from other namespaces Process ID
- 5/ User: User and group IDs.
- 6/ UTS: helps isolate the Hostname of the computer that the process sees.
With basics out of the way, let’s dig into container networking.
The Big Picture - Theory
You will become familiar with the conceptual building blocks that makeup container networking.
Starting with the familiar, diagram below shows the standard networking components commonly used on physical machines or VMs (switches, NICs, IP Tables etc.).
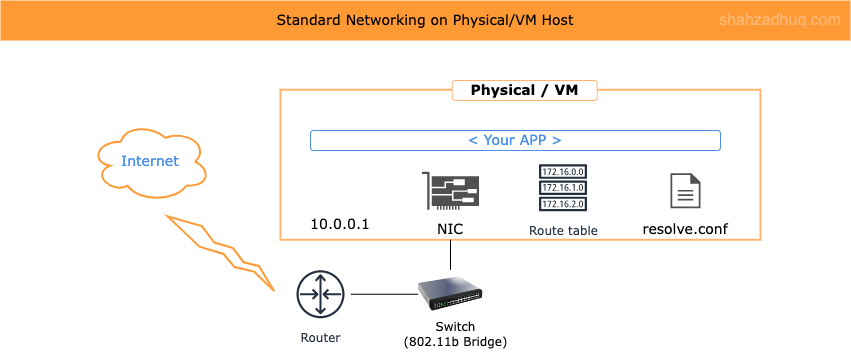
Container networking leverages these standard networking components but virtualized and isolated for the container. The virtualization and isolation is provided by Linux Namespace feature called, net namespace, and it follows the Container Network Model (CMN) standard. CMN is discussed next.
CNM - Design Specifications
It defines the fundamental building blocks of Docker networking. We will focus on three primary design specifications
- Sandbox: defines design specification to achieve isolated virtual network stack (net namespace) for the container.
- Endpoint: It represents the virtual ethernet interface (commonly
veth) which connects the container to its Host machine’s network. - Network: it represents group of Endpoints that enables containers to communicate with each other.
veth(virtual Ethernet devices): They can act as tunnels between network namespaces to create a bridge to a physical network device in another namespace, but can also be used as standalone network devices. veth devices are always created in interconnected pairs.
CNM - Implementation
Libnetwork is the defacto library that provides real-world implementation for CNM design specifications discussed above. Libnetwork will create the network stack (net namespace): network interface (veth), IP address, iptables etc.
Network Drivers
Docker’s networking subsystem is pluggable, using drivers. Several drivers exist by default, and provide core networking functionality like Bridge, Overlay, and more (additional details in Container Networking Topologies section).
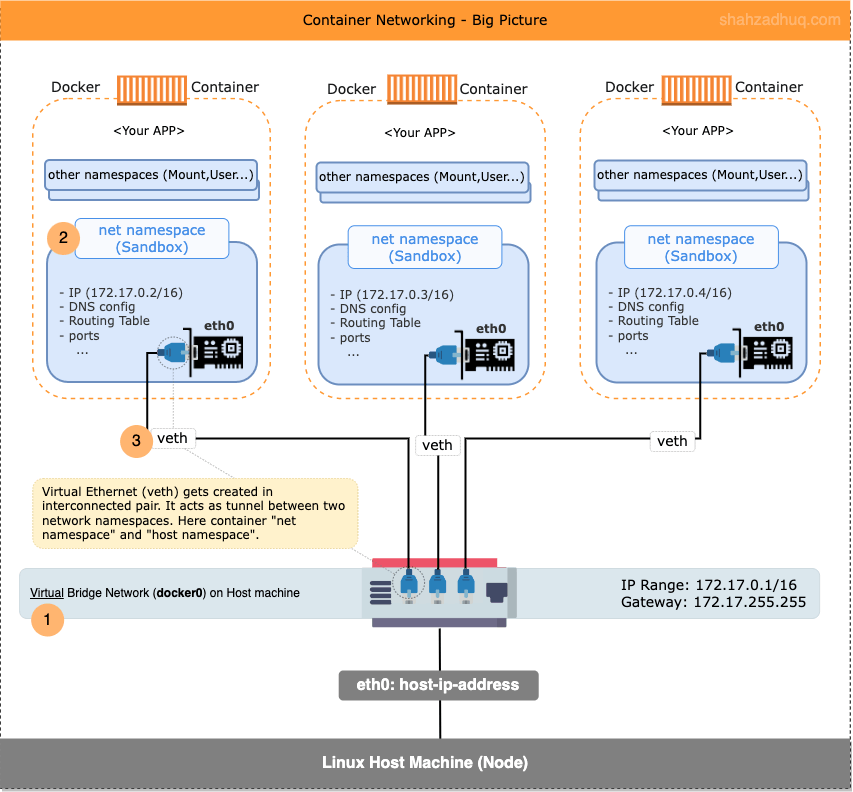
Putting it all together, diagram below shows set of high-level activities that facilitate creation of container networking
- 1/ When docker is installed, it creates a virtual bridge network called “docker0” on the Host machine. By default, new containers are connected to it.
- 2/ For new container, net namespace is one of the may namespaces created; docker calls Libnetwork to implement the network stack (virtualized: NIC, iptables, IP address etc.).
- 3/ Docker attaches the container to its default “docker0” bridge network.
For ease of visualization, I think of
vethas a physical ethernet cable which connects both container and the host (i.e. container namespace with the host’s root namespace).
In next section, you will go hands-on and learn the nuts and bolts of container networking.
The Big Picture - Hands-on
Play-by-play, you will build The Big Picture to better understand the sorcery (fun details) behind simple docker networking commands.
Here is the plan
- 1/ On your container’s host (Node here on), you’ll explore the default network stack available.
- 2/ Install Docker on the Node and observe additions to the Node’s default network stack .
- 3/ Spin up a container on the Node and observe more additions to Node’s default network stack .
- 4/ Get inside the container and explore container’s own network stack.
FYI: play-by-play shown below uses Linux Ubuntu (22.04.1 LTS) Node running inside VM on physical Mac, Docker container, and bridge network topology. Also, specific outputs like virtual ethernet device name, MAC address etc. shown below will vary in your setup.
Note: You could follow along using Docker Desktop. On Windows, ensure to switch to Linux container mode.
Let’s get started!
1/ Prior to installing Docker on your Node, observe its default network stack.
# Environment: Node # In Linux terminal, run this command to list all network devices. ip link show # On Mac ipconfig getiflist # On Windows ipconfig /allOutput: You should see following two network devices.
- ”
lo” is the software loopback network interface which enables it’s own localhost. - ”
enp0s5” is the virtual ethernet adapter for this Node.

- ”
2/ Install Docker (instructions) on your Node and observe additions to Node’s default network stack.
- On Node, Docker has created a default bridge network called ”
docker0“. - By default, new containers will join this default network.

Let’s explore the “docker0” bridge network further.
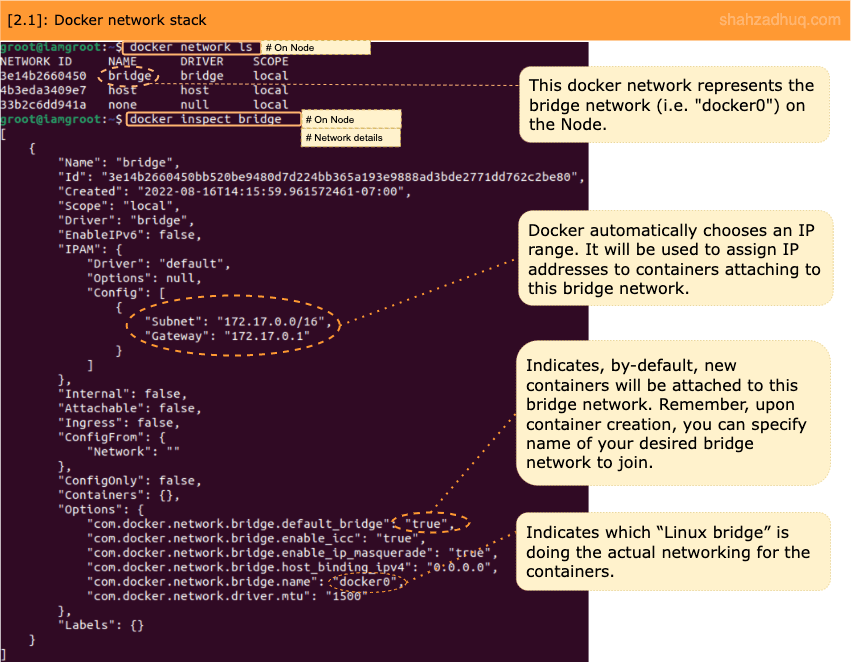
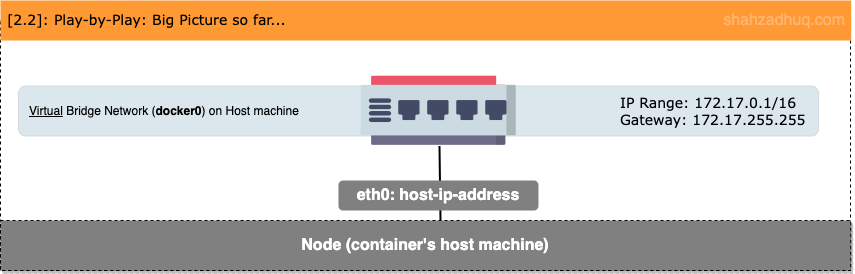
Diagram below shows the big picture built so far.
- On Node, Docker has created a default bridge network called ”
3/ Let’s spin up a new container. With the container running, observe addition of
veth*to Node’s default network stack.# Environment: Node # This command will create # A background ("-d" param) container named, "ctr1" # Also, a shell session ("-it" and "ash" params) running inside it. # You will connect to this container later. docker run -d -it --name ctr1 alpine ash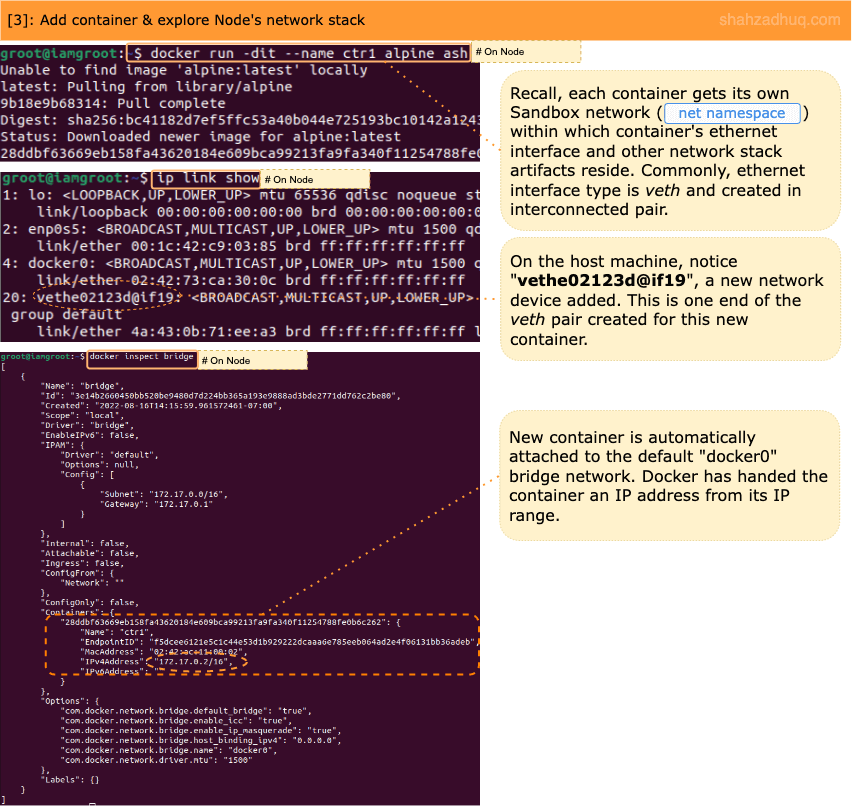
4/ Let’s get into the running container and from inside the container, explore the sandbox network stack created for this container.

Diagram below shows the big picture blueprint completed.
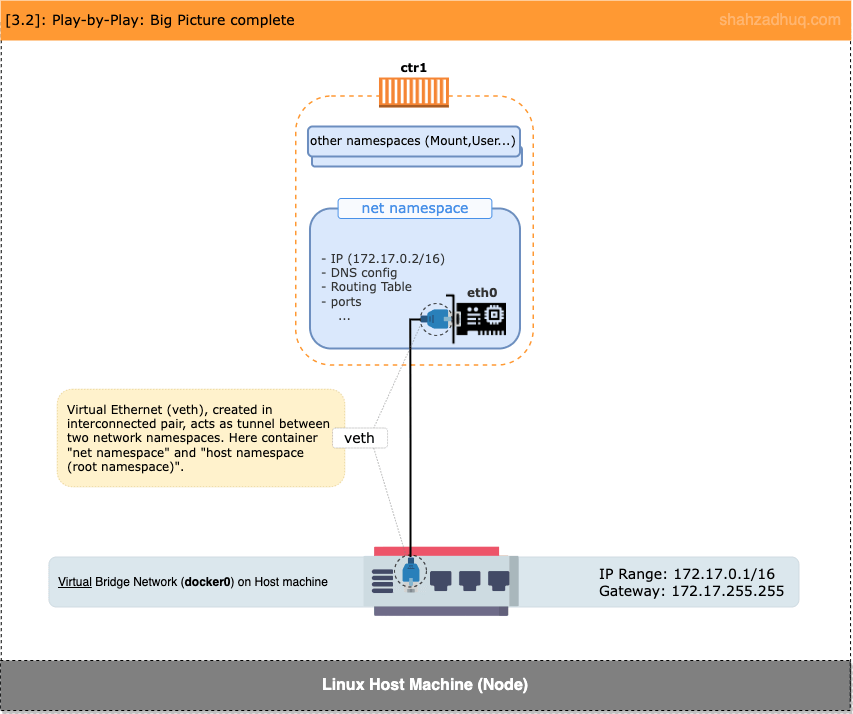
As an exercise, try creating additional containers - ctr* - and explore both Node and respective container’s network stacks.
In addition to docker’s default bridge network, you can create custom networks and attach existing/new containers to it.
# Environment: Node

# In terminal, run this command to create a new bridge network (default uses bridge network driver).
docker network create my-custom-bridge

# Now you can connect existing or new container to your "my-custom-bridge" network. For instance,
docker network connect my-custom-bridge ctr1
With container networking building blocks under you belt, let’s understand different networking topologies used with containers.
Container Network Topologies
A network topology is the physical and logical arrangement of nodes and connections in a network. Nodes commonly include devices like switches, routers and software with switch, and router features.
Sections below explain the different network topologies used for containers.
Bridge Network - for Single-Host
Bridge network is commonly used for local development. Containers connected to the same bridge network can talk to each other.
Bridge Network: its synonymous with virtual Layer-2 switch and they are scoped local to a single Node (i.e. container host).
Diagram below shows Bridge network in action
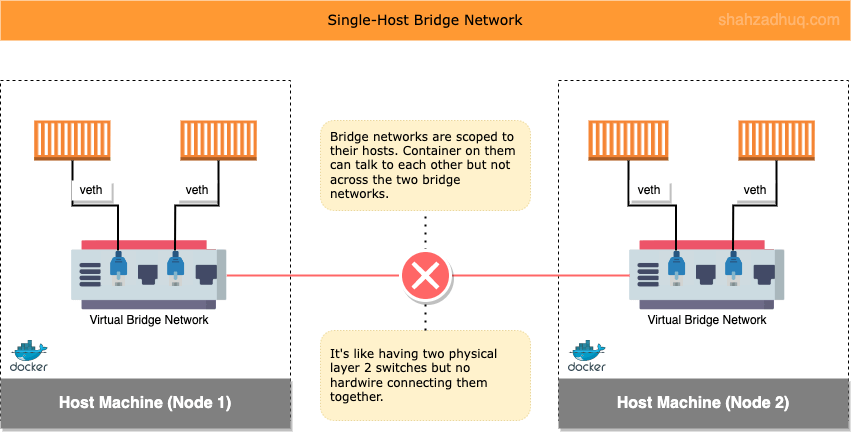
Enterprise use cases need to connect containers across multiple networks and multiple Nodes. Since Bridge networks are scoped local to the Node, for production, you will commonly use the Overlay network topology (multi-host network).
Additional helpful information
When leveraging single-host bridge network, its recommended to use your own custom bridge network.
# For instance
docker network create my-custom-bridge
Why custom bridge?
Containers connected to custom bridge network can reach each other via both IP and container name (on default Bridge network, reachable via IP only.). Docker embedded DNS server powers this behavior: Docker will automatically register containers created with --name flag and connected to the custom bridge network. For more insight into how this works, reference the Docker - Service Discovery discussed later.
Let’s walk through an example to see how containers can reach each other via their name.
// Environment: Node

# Create your custom Bridge network
docker network create my-custom-bridge

# Create two containers and connect them to your custom Bridge network
docker run -dit --name web --network my-custom-bridge alpine ash
docker run -dit --name db --network my-custom-bridge alpine ash

# Get into one container
docker attach web

# Then, while insdie the container, ping the other container
ping db
From outside the network, you could access these containerized applications on published ports (e.g. node:container —> 5000:8080).
// For instance
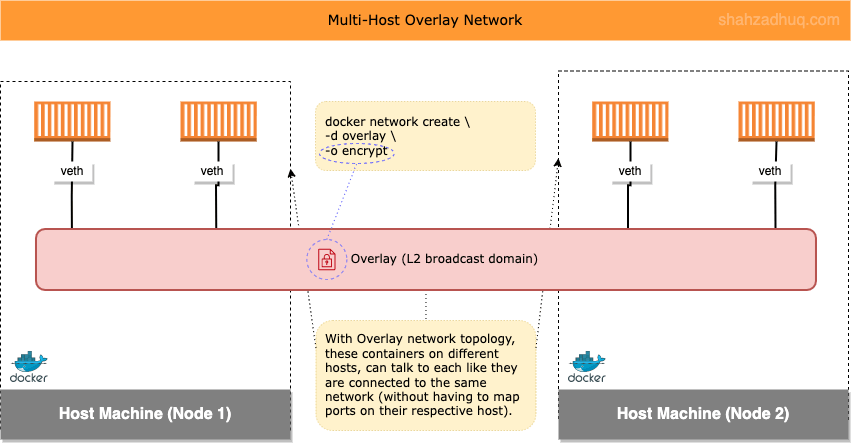
http://localhost:5000Overlay Network - for Multi-Host
An Overlay network is defined as a virtual or logical network that is created on top of the existing Node-specific networks. You get a flat network that spans across multiple Nodes (e.g. Nodes in same/different data center, in cloud same/different availability zones etc.). Also, with a simple flag (-o encrypt), you can create Overlay network with encrypted traffic.
Overlay Network: it provides L2 broadcast domain: meaning, every device connected to this network can talk to each other like they are on the same network.
Its commonly used in production to allow containers running on same and different Nodes to be able talk to each other.
Diagram below shows high-level of an Overlay network
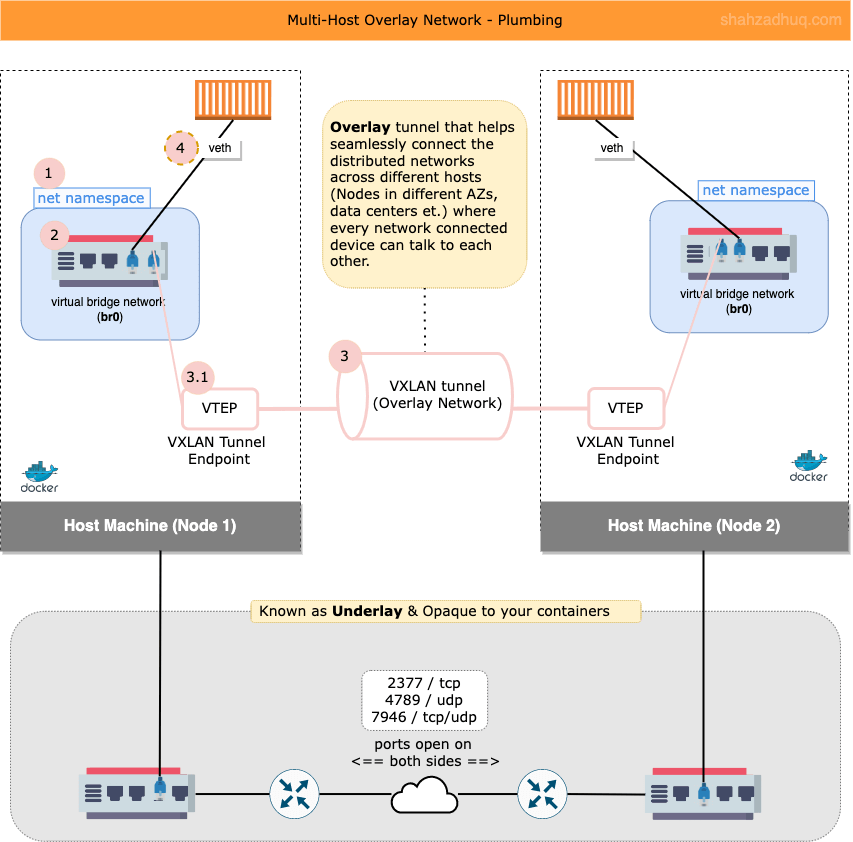
Overlay Network Plumbing
This network type has two separate concerns called, Overlay and Underlay. Commonly, Underlay concerns will be handled by your dedicated network team and you will mostly focus on Overlay (Reference docker blog for more detail).
Focusing on the Overlay side, diagram below shows high-level activities performed by Docker to bring up the Overlay network.
- 1/ First, on user defined Node, Docker creates network sandbox (
net namespace).Note: This is not a container. Linux Namepsaces - net namespace - is used to create the isolated network stack under this Node’s root namespace.
- 2/ Second, inside this network sandbox, Docker creates the virtual bridge network (br0).
- 3/ Third, Docker create the VXLAN tunnel, the VXLAN Tunnel Endpoint (VTEP), and connects its bridge network (br0) to the VXLAN tunnel.
- 4/ Now containers connected to their respective Bridge network (br0) - via veth - can talk to other container, whether they are on the same Node and across multiple Nodes.
Also, Overlay network has a property called “Attachable”. By default, Attachable is set to false and only the containers managed by Docker’s service controller (e.g. in Swarm setup) can attach to the Overlay network. You can create attachable Overlays (Attachable=true) and then standalone containers can join the Overlay network.
Peculiar Behavior (works as designed)
In cluster Nodes setup (multi-host), Docker will create the Overlay network on-demand. Meaning, it will only create Overlay network on those Nodes that have a running container connected to this Overlay network. In large scale environment, Docker’s uses this “feature” to keep the network chatter to a minimum .
For example,
- You have a Docker Swarm cluster made up of three Nodes: Manager-1 (M1), Worker-1 (W1), and Worker-2 (W2). And as of now, you’ve no containers running.
- On M1, you create an Overlay network. If you list networks (
docker network ls) on W1 and W2, you won’t see this newly created Overlay network. - Now when you bring up containers on Nodes W1/W2, connected to this Overlay network, docker will create Overlay network stack on those respective Nodes.
MACVLAN Network
MACVLAN network topology is used for niche use-cases like
- Applications/containers need to be connected directly to an existing VLAN or physical network.
- And they require individual MAC-address for communication.
MACVLAN are commonly used for applications like network ‘sniffers’, other scanning tools, and maybe system management apps. MACVLAN carry specific requirements listed below
- Its a Linux networking driver and requires 4.x kernel.
- It needs a network card on the Docker host in Promiscuous mode. This single NIC will advertise multiple IP and MAC addresses on the network.
Be mindful, Promiscuous mode in NIC isn’t normally allowed in most Public clouds.
For majority of your real-world use cases, you will commonly use Overlay networks. Only use MACVLAN if you’ve specific use case that needs it.
IPVLAN Network
IPVLAN network topology is similar to MACVLAN in connecting apps/container with the existing VLAN network but with following differences.
- Every container shares the same MAC address of their parent interface; every container does get their own IP address.
- This allows the NIC to NOT have to perform in Promiscuous mode.
Only use IPVLAN if you’ve specific use case that needs it.
Docker - Service Discovery
Service discovery is the mechanism Docker uses to route a request from your service’s external clients to an individual swarm node, without the client needing to know how many nodes are participating in the service or their IP addresses or ports. You don’t need to publish ports which are used between services on the same network.
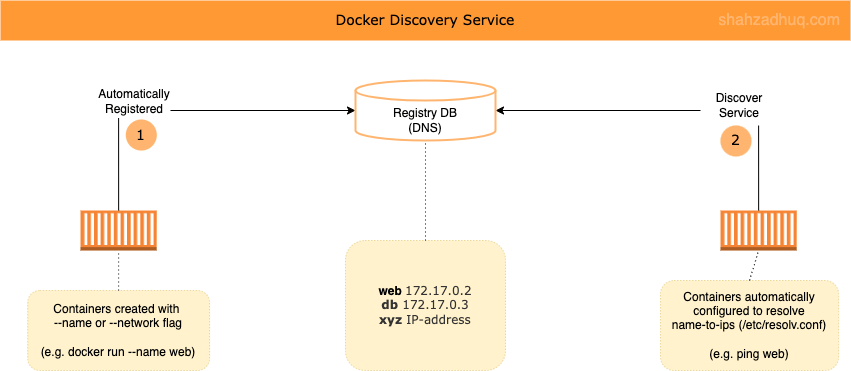
Docker service discovery has two main parts
- 1/ Registration service: when you create a container (app) - with a name flag or network flag - docker will automatically list them in its Registry (i.e. DNS entry).
- 2/ Discovery service: subsequently, other containers deployed are automatically configured to talk to the internal DNS server (get a local copy at
/etc/resolv.conf) for service discovery (i.e. to resolve name to specific container IP that would serve the request). - Both of these parts use central “Registry” database. Docker uses DNS for it’s Registry database.
Through the magic of networking (IPTables and IPVS), traffic gets routed to the container that is represented by this virtual IP.
Note: service discovery is locally scoped; meaning, it only works among containers/services connected the same Overlay network.
Diagram below shows the service discovery.
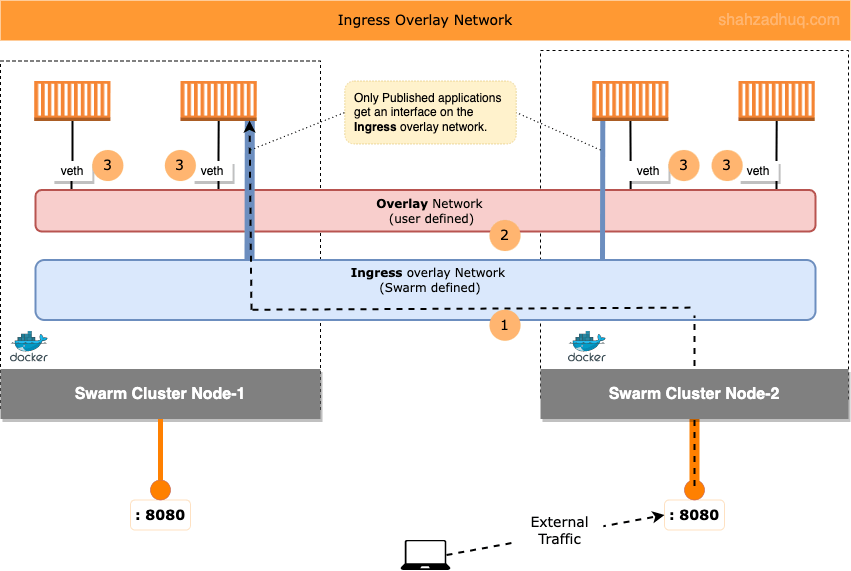
Docker - Ingress Networking
Ingress networking is responsible for getting external traffic to your published application running on one of the cluster Nodes.
Diagram below shows how Ingress networking comes about
1/ When you create a Docker Swarm cluster, following two are created: 1/ an
Ingressoverlay network and 2/ a virtual Bridge calleddocker_gwbridge(more on it later).Tip: Ingress overlay network is to handle the ingress traffic ONLY. It’s not the multi-host Overlay network that you create to connect containers. So, do NOT put your business application (i.e. connect app containers) to this Ingress overlay network.
2/ To connect all Nodes together over a flat network, you will create a user defined Overlay network (discussed earlier under Network Topologies section).
Tip: Recall, user defined Overlay network only gets extended to those Nodes that have containers using this network.
3/ Then deploy your application and connect your app containers to the user defined Overlay network and publish it on your desired port (e.g. 8080).
The published port (e.g. 8080) gets published Swarm wide; every Node will have the published port reserved for this application.
Also, automatically, your published application gets an interface on theIngressoverlay network as well.
Now, when external traffic hits any Node on the published port (e.g. 8080), it will be able to reach your application. Ingress overlay network load balances (round robin) the traffic across the application containers hosted on different cluster Nodes.
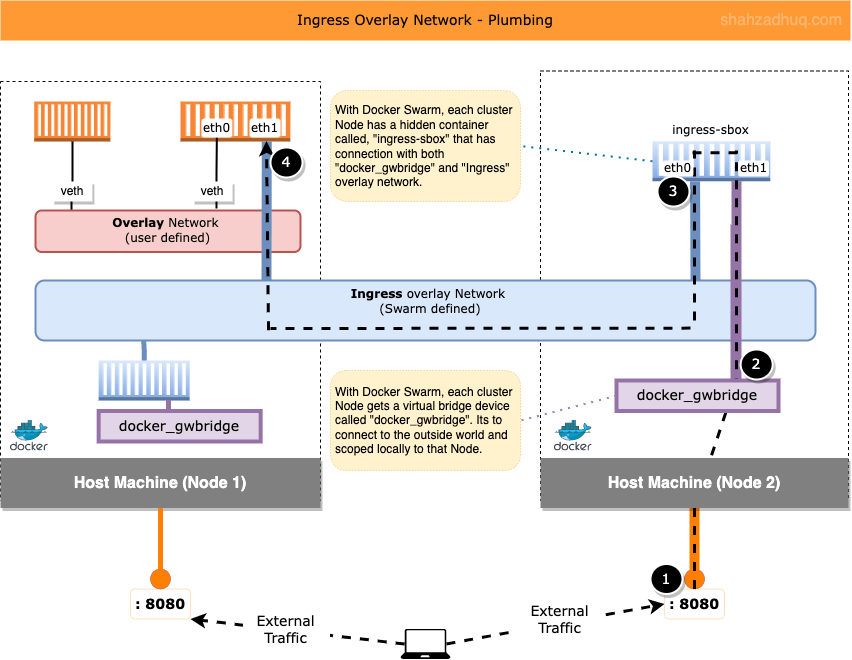
Ingress Overlay Network Plumbing
If you would like “under the hood” peek of how Ingress overlay networking works, then continue reading (Docker Swarm hides all this behind its simple commands).
Diagram below shows how the external traffic gets routed to your published application.
1/ When external traffic hits the Node on user defined published port (e.g. 8080), it get routed to virtual Bridge network called “docker_gwbridge” (Swarm creates this automatically).
Tip: published services - apps exposed to the outside world - automatically 1/ get a connection to the user defined Overlay network. 2/ an interface on the Ingress overlay network.
This means, if traffic hits a Node without the app container, it will be re-directed by the Ingress controller to the Node that does have the container running.Tip: “docker_gwbridge” connects the individual Docker daemon to the other daemons participating in the swarm.
2/ From “docker_gwbridge”, the traffic gets routed to the “ingress-sbox”.
Tip: “ingress-sbox” is a hidden container with network connections (interfaces) to both networks, “docker_gwbridge” and “Ingress” overlay.
Tip: Technically, “ingress-sbox” isn’t a full blown container (collection of namespaces). Simply, its a network sandbox encompassing the necessary network stack to drive the needed functionality.
3/ From “ingress-sbox”, traffic gets redirected to the interface on the Ingress overlay network.
4/ Finally, from the Ingress overlay network, the traffic reaches your published application container.
Behind the scenes, routing mesh (iptables and ipvs) is hard at work routing traffic in/out of different network interfaces.
Conclusion
Containers leverage virtualized versions (network sandbox) of the standard networking components used with physical machines and VMs (switches, NICs, IP Tables etc.). Linux feature, net namespace, helps provide the network sandbox with isolated instance of the network stack to drive container networking.
Commonly you will encounter two network topologies, Bridge network and Overlay network. Bridge networks are single-host, scoped local to its parent Node (containers across Nodes can’t talk to each other), and commonly used for local development. Conversely, Overlay networks are multi-host, helps connect containers running on same or different Nodes, and most commonly used in production.
You learned how Docker Service Discovery mechanism enables containers in the cluster to find each other by name, without having to retain their ephemeral IP addresses. Also, you learned how Ingress overlay network helps the external traffic reach your published applications containers running in the multi Node cluster.